If you own a car, chances are you’ve experienced some kind of electrical issue at some point. One of the most common problems is a faulty wire, which can cause a variety of issues ranging from minor inconvenience to major safety concerns. Fortunately, car wiring repair is a fairly straightforward process, and with a little bit of knowledge and the right tools, you can diagnose and fix most issues yourself.
The first step in any car wiring repair is to identify the faulty wire. This can be a bit tricky, as the wiring in a car is often hidden behind panels and other components. However, with a little bit of patience and a good understanding of how electrical systems work, you should be able to locate the problem. The most common signs of a faulty wire include:
- Flickering or dimming lights
- Electrical components not functioning properly
- Blown fuses
- Burning smells or smoke
- Sparks or arcing
- Dead battery
Once you’ve identified the faulty wire, the next step is to remove the damaged section and replace it with a new one. This can be done with a variety of tools, including wire cutters, strippers, and crimpers. It’s important to use the right tools for the job, as using the wrong tool can damage the wire and make the problem worse.
Before you start any repair work, make sure to disconnect the battery to prevent any electrical shock. You should also make sure to use the right gauge of wire for the repair. If you’re not sure what gauge wire you need, consult your car’s owner manual or a wiring diagram.
When replacing the damaged section of wire, make sure to strip back the insulation on both ends to expose the bare wire. Then, use a crimping tool to attach the new wire to the existing wire. Make sure the connection is tight and secure, and cover the connection with electrical tape to prevent moisture and dirt from getting in.
It’s important to note that car wiring repair can be dangerous if not done properly. If you’re not comfortable working with electrical systems, it’s best to take your car to a professional mechanic. Additionally, if you’re dealing with a major electrical issue, such as a short circuit or a damaged component, it’s best to have a professional diagnose and repair the problem.
In conclusion, car wiring repair is a fairly simple process that can be done with the right tools and a bit of knowledge. By identifying the faulty wire, using the right tools, and taking the proper safety precautions, you can quickly and easily fix most electrical issues in your car. Remember to always prioritize safety and don’t hesitate to seek professional help if needed.
Regardless of which circuit has a problem, troubleshooting electrical problems uses the same equipment and approaches. Voltage, current, and resistance are required in all electrical circuits. The key to good diagnosis is testing for these, measuring them, and comparing your measurements to specifications. To do so, you’ll need a firm grasp on these fundamental electrical properties. The electrical pressure that drives electrons to flow when there is a complete channel for them to follow is known as voltage. The rate of electron flow can be described as the aggregate flow of electrons via a wire. The term “resistance” refers to antagonism to the prevailing flow. To convert electrical energy to light, heat, or movement, an electrical circuit must have resistance.
An open, a short, or an extreme voltage drop in an electrical circuit might cause it to perform incorrectly. An open circuit is one in which there is a gap in the continuity of the circuit. On either the insulated or ground side, the open can be found. The resistance of a circuit is reduced when it is shorted. This occurs when a circuit is shorted to another circuit or when a circuit is shorted to ground. One of the circuits is not controlled by its switch when there is a circuit-to-circuit short. The complete parallel circuit will turn on and off with the switch controlling the other circuit because the shorted circuit forms a new parallel leg to the circuit. Many unusual things can happen when dealing with this type of issue. When a circuit is broken, it is said to be shorted.
Problems with high resistance might develop anywhere in the circuit. High resistance, on the other hand, has the same effect no matter where it is. Additional or undesirable resistance in series with a circuit will always diminish the circuit’s current and the amount of voltage drop caused by the component in the circuit.
Circuit Defects Must Be Tested
An open, a short, a ground, or an extreme voltage drop in an electrical circuit might cause the circuit to operate incorrectly.
Opens are being tested.
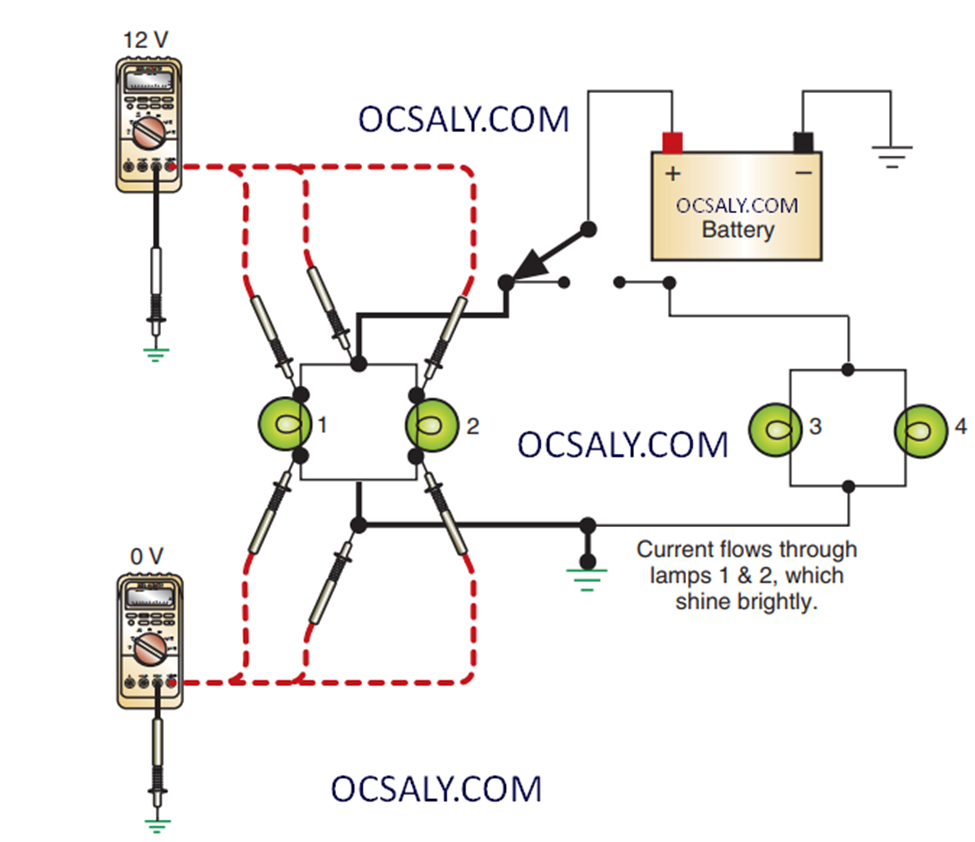
A voltmeter, DSO, test light, self-powered test light, ohmmeter, or jumper wire can all be used to check for openings. The test equipment utilized will be determined by the circuit being examined and the components’ accessibility. Before attempting to figure out what’s wrong, the technician must first identify how the circuit should work. The voltmeter readings that should be received in a correctly working parallel circuit are shown in the diagram. The simplest way to test a circuit is to start at the most accessible location and work your way down. Test for voltage at the load’s input if the load component is conveniently accessible. To find the open, use the following procedure:
The replacement or repair of a damaged conductor is a common part of electrical repairs. Today’s technician must be able to read and comprehend electrical diagrams and schematics in order to pinpoint the source of the problem. The schematic should always be the beginning point in diagnosing an electrical system once it has been confirmed that the battery is working properly. The diagnostic method of detecting and identifying the fault’s source is known as troubleshooting. It’s a cause-and-effect approach to eradication. The technician can figure out how the circuit should function by looking at the diagram. Before attempting to figure out why it isn’t working, make sure you have these information.
The component locator will aid the technician in locating the electrical components depicted on the schematic. The component finder will frequently include information on connectors, grounds, and splices.
The following is the procedure for troubleshooting an electrical issue:
- Confirm the complaint. Perform a system check to figure out what’s going on. Enter diagnostics to receive any issue codes if the defective system is monitored by the onboard computer. Trouble codes are alpha/numeric codes generated by the self diagnostics program that indicate malfunctioning circuits or components.
- Concentrate on the electrical schematic. This will show any common circuits. Attempting to work the common circuits will assist with guiding the specialist to the trouble spot. If the common circuits work accurately, the issue is detached to the wiring or parts of theissue framework. In the event that the common circuits don’t work, the issue is ordinarily in the power or on the other hand ground circuit.
- Find and fix the problem. The defect is found by narrowing down the likely causes and obtaining the necessary measurements. Check the ground and power leads before replacing any components. If these are positive, the component is negative.
- Make a test of the repair. Check the system once more to make sure it’s working properly.
Electrical Wire Repair
Not every electrical repair necessitates the removal and replacement of a defective component. A damaged conductor is frequently the source of the problem. The technician must make a circuit repair that does not add to the resistance. It should also be a long-term fix. A damaged wire can be repaired in a variety of ways. The sort of repair employed will be determined by a variety of criteria, including:
1. Type of repair required.
2. Ease of access to the damaged area.
3. Type of conductor.
4. Size of wire.
5. Circuit requirements.
6. Manufacturer’s recommendations.
Wrapping damaged insulation with wire is one of the most popular ways of wire restoration. soldering, crimping the connections with solderless connectors, and electrical tape or tubing splices.
Repairing Copper Wire
In the automotive, copper wire is the most widely used primary wire. Due to stress or excessive motion, the insulation may deteriorate or the wire may break. Excessive current flow via the wire may potentially cause damage to the wire. Any of these circumstances necessitates the repair of the wire.
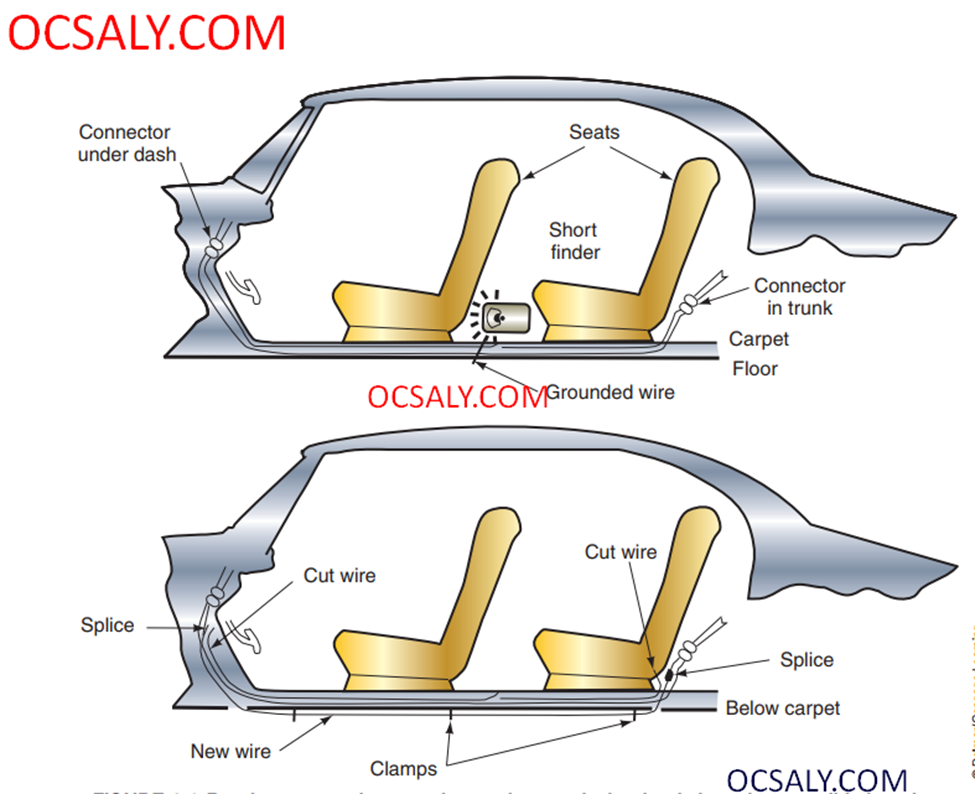
It may be required to bypass a section of wire that is not accessible in some cases. Cut the cable before it enters the inaccessible region and at the other end when it exits the area in this scenario. Replace the wire with a new one and reroute it to the load component .Use straps, hangers, and grommets to protect the wire if necessary .Solderless connectors and soldering are the two.
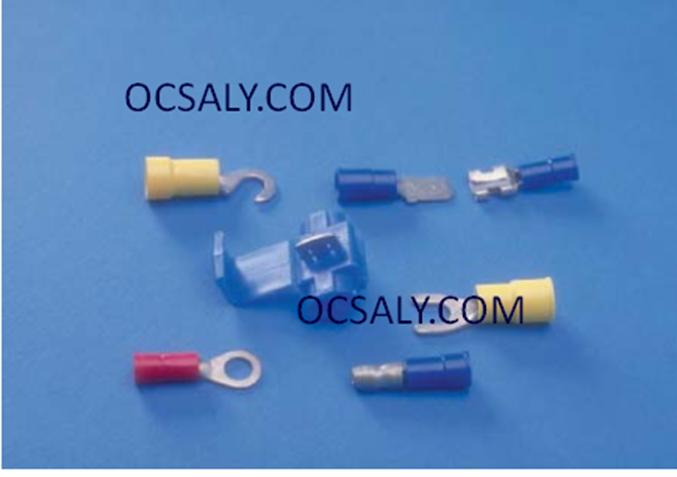
Crimping. Crimping solderless connectors is a good way to splice wires that won’t be exposed to the elements, dirt, corrosion, or extreme movement. In addition, crimped connections should not be used in electronic circuits. A faulty connection or corrosion over time can cause the system’s electronic control to malfunction. To make a splice with solderless connections, do the following:
1. Remove enough insulation with the suitable size stripping opening on the crimping tool to allow the wire to completely penetrate the connector. The tool for crimping has several locations for executing a variety of tasks . This single tool is capable of slicing through the peel the insulation from the wire, and crimp the connector.
2. Crimp the connector after you’ve inserted the wire . Obtaining a proper When crimping, make sure the connector’s exposed portion is towards the anvil. Make certain the wire is in good condition under the crimp, compressed.
3. Crimp the other wire’s stripped end into the connector.
4. To give further protection, use electrical tape or a piece of heat shrink tube. When subjected to heat, heatshrink tube shrinks in diameter.
Car wiring is a complex system that runs throughout the vehicle, connecting various electrical components to the battery and other power sources. The wiring is made up of many different types of wires, each with its own unique color and purpose. Understanding the different types of wires and their functions is essential when it comes to diagnosing and repairing electrical issues in your car.
When it comes to finding a faulty wire, it’s important to have a basic understanding of how electrical systems work. In general, electrical current flows from the battery to the various components in the car, such as the lights, radio, and air conditioning. If there is a break in the wiring, the current cannot flow properly, which can cause a variety of issues.
To find a faulty wire, start by checking the components that are not functioning properly. For example, if your headlights are flickering, you’ll want to start by checking the wiring and connections to the headlights. Look for any visible signs of damage, such as frayed wires or loose connections.
If you can’t find any visible signs of damage, you may need to use a multimeter to test the wiring for continuity. A multimeter is a tool that measures electrical current and resistance. By testing the wiring at various points, you can determine whether there is a break in the circuit.
When it comes to repairing a faulty wire, it’s important to use the right tools and materials. In addition to wire cutters, strippers, and crimpers, you’ll also need electrical tape, solder, and a soldering iron. Soldering is a process that involves melting a small amount of metal (solder) onto the wire to create a strong and durable connection.
When soldering wires, it’s important to use caution and follow proper safety procedures. Make sure to wear eye protection and work in a well-ventilated area. You should also make sure to use the right type of solder and flux, as using the wrong materials can damage the wire and make the problem worse.
Overall, car wiring repair and finding faulty wires can be a challenging process, but with the right tools and knowledge, it’s a task that can be tackled by most DIY enthusiasts. Just remember to take your time, prioritize safety, and don’t hesitate to seek professional help if needed.


